At my Master’s show, I received a commission for a pomegranate planter, two egg white separators, and a two-piece African violet pot (it waters from the bottom). I was happy to oblige. From all reports, my customer was happy.
The pomegranate planter and the egg white separators are majolica or a combination of majolica and underglaze. The African violet pot is white clay on the bottom and white clay painted with red clay slip on the top. The turquoise glaze I used (my own creation) reacted differently with the two different types of clay, as expected.
Can you imagine this guy with straight or curly green hair sprouting out of the top of his head? I made this for my son.
The Amaco oatmeal glaze made an interesting complexion. For the mustache and eyebrows I used my matte black glaze and for the hair, my newly formulated black lava glaze.
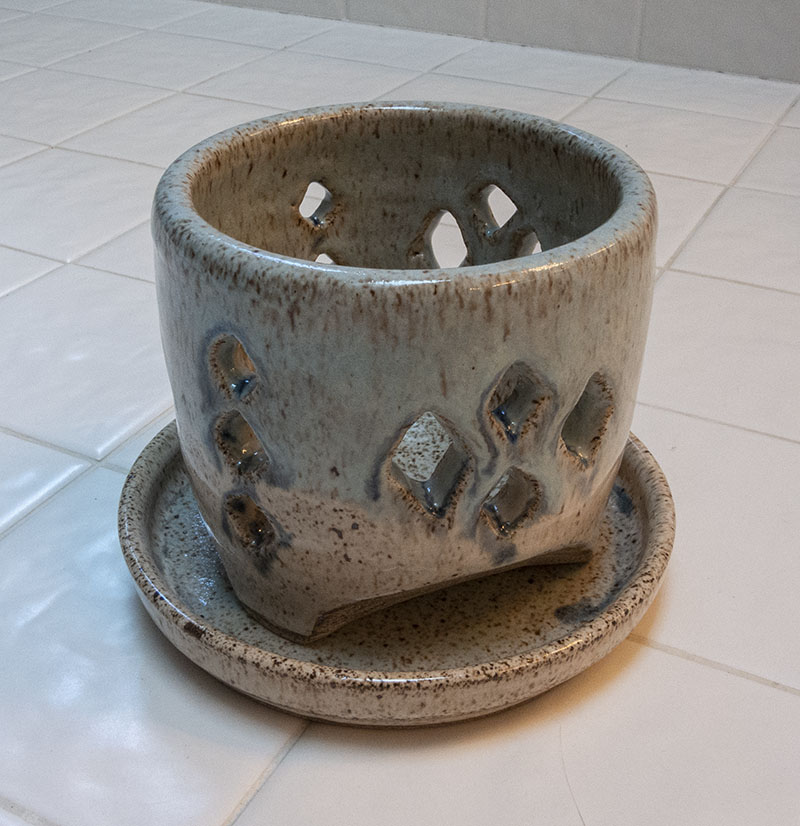
Here we have a planter made from three cylinders that I cut apart and reconstructed to create nooks and crannies that would be welcoming to a variety of small plants living in close proximity and harmony. I envision succulents that overflow the sides alongside a couple of taller plants for visual contrast. But the beauty of this piece is that the owner of it is able to continue the artistic endeavor by imposing his or her own choices and array of plants. The result will vary from person to person!
I tend to be not much of a salesperson, but this might be a good time to mention that all of the ceramics I made are for sale. After all, I would soon have to move out of my house to let the pots reside here in my stead if I didn’t find homes for them. If I want to continue creating, off they must go. Tis the season. Perhaps you have some gift-giving ideas for the upcoming holidays that might include ceramics. If so, please peruse my posts and get in touch with me if you see something you would like to give as a gift to someone or even to yourself! I’ll be happy to hear from you.
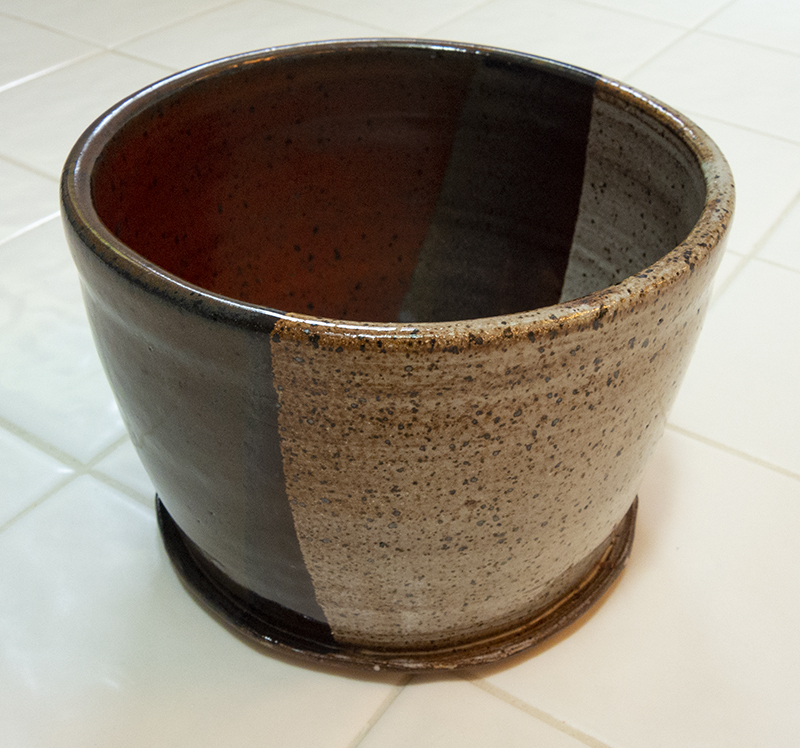
Here is a miraculously successful pot with an interesting back story. I created it closer to the beginning of my project, before I started experimenting with blending multiple forms. It looks sort of like a sarcophagus, doesn’t it? I started with a large open cylinder, to which I added a bottom to fit the resulting altered shape, and then three feet. Because the clay seemed to be the same moisture level when I married up the pieces, I unwisely neglected to score and slip (rough up the attachment surfaces and add some soggy clay) the pieces before joining them. I thought they would hold.
The pot made it all the way home from the studio where it was bisque fired before it literally came apart in my hands and hit the floor. Miraculously, the pieces came apart cleanly, mostly without breakage. I thought about tossing the entire mess into the trash can, but then decided to try a little magic. Nothing ventured, nothing gained.
I used a concoction called “tacky slip” that I had made based on intel gleaned from my various glaze classes to repair the slight breakage on the base and to glue everything back together. I also mixed in some E6000 glue (which I expected would burn off during the next firing) when reattaching the feet as I felt they would be the most vulnerable. I then had to decide whether to rebisque the piece before glazing or to just throw a “hail mary” pass and go straight for a glaze fire. I decided to go for broke and proceeded to apply a hefty coating of glaze to help glue everything into place. I used my own brews: sienna over magnesium crawl.
As you can see, it worked out rather splendidly! Everything held together, and with the exception of a couple of small areas of non-coverage around the foot joins (due to the glue), it all looks really good. It just needs a mummy now.
If you recall, peacock #1 blew up in the kiln because of water trapped in the clay after I water tested it, then tried to glaze the previously unglazed inside. Peacock #2 has arrived, nicely water tight and with no issues. Here we have, from right to left, side view of peacock, front view of peacock, and peacock with cat.
I haven’t flower-tested this peacock yet, but the idea is to have flowers form the tail. I
re-engineered the flower holes so that the stems will hopefully stay upright, not flop over backwards as they did in peacock #1.
A number of years ago, I decided that I would like to try my hand at orchids. After all, they are beautiful plants and I had a perfect place for one. You just water them once a week, right? Or so I thought. My husband bought me a gorgeous (expensive) large orchid, which I proceeded to kill. I was devastated! So, we got another. Dead within a relatively short period of time. Well, since that time, dogged person that I am, I have bought and done in many other orchids, mostly the inexpensive Trader Joe’s variety. But somehow along the way, I have learned how to take care of them and, lo and behold, over the years have become pretty good at not only keeping them alive, but at keeping them thriving and reblooming.
I have to give a lot of credit to Tom the orchid guy at a small mom & pop place where he grows and sells orchids near where I live. He is the orchid whisperer, and over the years has taught me how to care for them properly. This ceramic orchid pot is the outer pot into which you place an orchid potted in bark or moss in a plastic pot with holes. The holes in the outer pot allow air to circulate around the roots while keeping them out of standing water, which will rot them after a while. I made this orchid pot for one of my orchids, but unfortunately it’s just a little too narrow and not tall enough for my plant. I will have to try again. In the meantime, this one is for sale to anyone who wants an outer pot for a small orchid potted in a plastic pot that is less than 3.5 inches wide and around 3.25 inches tall.
So because I bombed out on Randy’s Red glaze on red clay on the jewelry and learned about the glaze needing a higher temperature, I tested out the theory on a red clay pot with a nice deep inside. On this planter (in which I forgot to poke a drainage hole–argh–my husband had to bail me out with his drill), the red on the inside came out beautiful. There is even a bit showing on the outside where the pot must have been close enough to something else to allow it to cool down more slowly. Not displeased with this pot (missing hole notwithstanding). Notice that it is also larger than my usual pots!
I consider this planter with built-in plate one of my successes. I was surprised that it was fairly easy to throw a bowl and plate as one piece. AND, it’s a fairly large piece for me!
After I got back from Turkey, Greece, and Italy, I made this. (It’s a planter in case you were wondering–it has a hole in the bottom to allow water to drain.) These are the first handles I attempted. A studio monitor suggested this style one evening as I rushed to finish by closing time and didn’t know the first thing about making handles. The influence of the trip and these handles drove the design for the rest of the pot. After scoring the design in the leather-hard clay, I painted in the grooves with black underglaze. On the bisqued pot, I applied wax to part of the design so it would resist the green glaze. Looks like it worked. We’re still pre-Ojai here.
I’m back! It’s a new season and a new class (yes, Wheel I again). This is a leftover from the last class that I didn’t have time to finish before the studio was closed for scrubbing. Sadly the plate that was also waiting in the wings to be glazed didn’t make it. Just as I was about ready to dip it into a glaze bucket, I accidentally knocked into a pile of stuff on the table and the whole pile went crashing to the floor, plate included. The plate was in sad shape; it went into the trash.
This little bowl is one of my success stories so far. Just a little thick, but not too bad, and (hallelujah) balanced. I applied an orange glaze to the bisqued piece, rubbed most of it off of the smooth areas, then applied a clear glaze over the whole thing.
I signed up for an evening class this time to get a different teacher. I figure, the more people I can learn from, the better. This teacher pointed out that I wasn’t wedging properly, causing bubbles in the clay that translate to lumps and uneven walls. So that’s what that was!!