Tea Party

My first teapot! I also made a pitcher and small creamer to go with it. My first set! I know, I know, it needs a sugar bowl. But I don’t put sugar in my tea, do you?

Par for the course, I was surprised and somewhat unhappy with the results. I was expecting white clay. I’m beginning to become very suspicious that my latest bag of “white, 66” clay was mislabeled. For months, I’ve been expecting this or that to be white and I keep getting “50” clay. The 50 clay has its time and place, but it doesn’t hold underglaze decoration very well, certainly not as well as white clay. The design here was supposed to be purple wisteria. Not only did the purple turn blue, but the details blurred. These pots looked so much better while still at the bisque stage. As usual, back to the drawing board.

So Sad…

DSCN5986

Here is what is left of my peacock. Several lessons learned here.

#1: Don’t get too attached to a project. It’s not done until it’s done. And even then, someone could come along and break it.

#2: But that’s not what happened here. If you read the original peacock blog post, the base was leaking water because I had not put a liner inside. It should have held water, but it was apparently not a given. Don’t know the whys and wherefores on that one. Someone thought that maybe the kiln temperature was not hot enough. I will in the future always apply a liner to pieces that are supposed to be watertight. I took my little guy back to the studio to fuss over him some more and glazed the inside. And then, maybe just shy of a week later, he went back into the kiln for refiring.

#3: My peacock blew up into a million pieces during firing. The base was pulverized. Some head-scratching and analysis on the part of several studio instructors ensued, after which they pretty quickly came to the conclusion that the clay at the base base must still have been holding some water. Kaboom! I won’t make that mistake again!

#4: My peacock took out about eight other pieces in the kiln. Sigh.

I will eventually make another peacock. In any case, it will give me the opportunity to resolve another functional issue. Flowers inserted into the back bottom holes tended to flop out rather than standing up straight to make the tail fan. I need to form backstops for all my holes so that the flowers stand up straight.

A Couple of Goblets

DSCN5980

This odd duo came out of another class project. While I don’t consider these goblets particularly useful from a functional standpoint, making them was fun and challenging. I had a couple of problems to overcome. One was getting a matched set in appearance and size. Not easy, as you can see. One is a bit taller than the other. The other problem was getting the cups to stick to the stems. Part of the reason why the taller goblet is taller is because the cup fell off and broke going into the kiln the first time around and I had to make a new cup for the still intact stem. I thought I had it right, but it’s hard to match sizing between two items when one has already been fired (and therefore shrunk). This was also before I realized that my calipers had a 12% reduction hole. Okay, well. The other problem you can’t see here (because I’m still a better photographer than potter) is that the placement of the cup on the taller of the two is a bit wonky and off kilter. I had to “glue” the cup onto the stem using glaze and hoping it would stick. There may have been some movement in the kiln or I just didn’t get it on there straight (more likely).

The decoration is black Stroke & Coat on red clay. I kept it simple, hoping that the black would minimize the off-center cup. Well…no.

A Bird Feeder

DSCN5977

This bird feeder is yet another class project. I’ve had a couple of creative teachers for the past four months. Not sure I would think of all this stuff to make on my own!

I still need to add the hanging wire. My teacher used a coat hanger.

For this piece (red clay), I swapped gabardine tan and creamy orange matte for first dip, second half dip, alternated on the bottom and the lid. The lip produced an unexpected and interesting result with orange first, followed by tan.


My Peacock

This started out as a closed form for a project in which we were making birds. Mine looked different from others’ in that while everyone else had squatty closed forms looking like birds sitting on nests, mine looked like a big egg. What to do? Hmmm…  Then the image of a peacock emerged (at least in my mind). I set to work. Here is the finished…well almost finished…result: a peacock vase where the flowers placed in the back holes will form the tail.  It’s decorated with underglaze (bisqued in) and then clear glaze over the top. I thought that I could get away with not glazing the inside, but the &*$%# thing won’t hold water. I’m told it should have, but who knows what happened. It’s red clay. Perhaps the kiln temperature was a bit off that day and the clay is more porous than white or 50.

Now my peacock is back on the shelf to be refired. I added a bit more strategic white glaze, slapped a coating of wax on the outside, poured clear glaze in the inside, then emptied it out. I’ve got my fingers crossed.

Coffee Pourover

DSCN5971

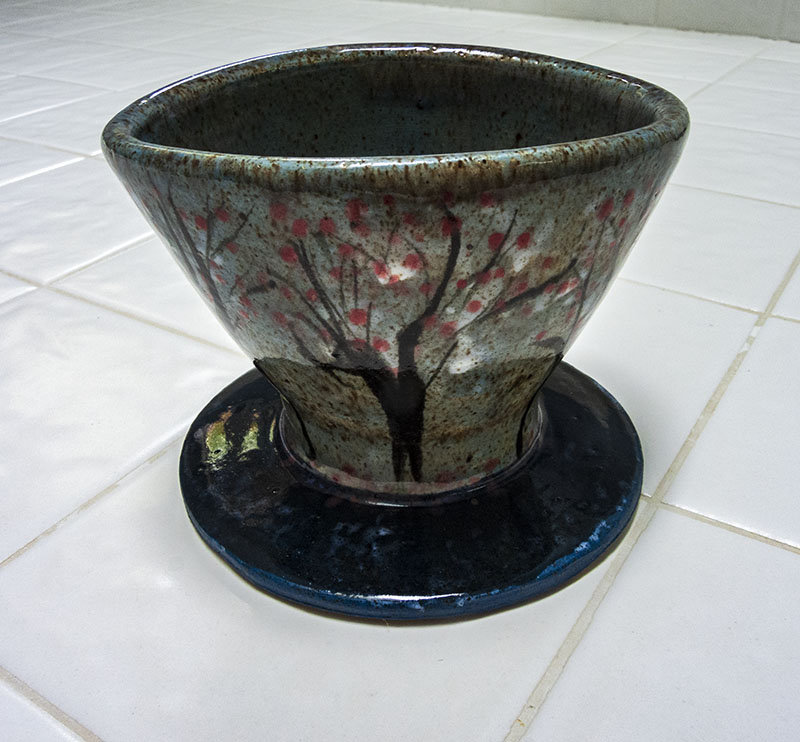
The person sitting at the wheel next to me at the Wednesday open studio sessions for a while inspired me to try my hand at making one of these coffee pourovers she was turning out at the rate of one per week. She was experimenting with functionality more than anything. I cashed in on her most successful design (there having been many flops apparently) and made this rather successful model.

So. A note about functionality. You can’t see the bottom, but there are two “feet,” one at the outer edge and one much closer to the center. This, presumably, is to prevent the liquid from leaking over the edge of the cup over which the pourover is placed. The squishy oval of the top is to accommodate the elongated cone-shaped paper filters.

More importantly, I had to learn how to use this device. The first cup of coffee I made was like dishwater. The water zoomed through the three holes at the bottom of the filter in about two seconds, barely saying hi to the ground coffee. I wondered if I had made the holes too many and too large. Enter Google search. Ah! The next time, I used TWO paper filters, poured over a small of boiling water that was just enough to wet the coffee and let it sit for 30 seconds (there is chemistry involved here), and then slowly poured the rest of the water so that it stayed connected with the coffee for long enough to make tasty coffee. Success! But even so, I think that next time, I think I will make either fewer or smaller holes in the bottom. I had no over-the-side leakage, so the feet did their jobs.

And a note about design. The week I made this pourover, I was inspired by the gorgeous dogwoods in bloom everywhere, in this case the pink ones. I used underglaze on “50” (lots of manganese) clay. The base color of the top is blue mixed with white. The base color of the bottom is blue mixed with black. There is some white for clouds (they were kind of swallowed on the bottom) and pink (red mixed with white) for the blossoms. Learning moment. The darker colors of underglaze overwhelm the lighter colors. I need to use less dark and more white for the mixes to get the tints I want.