I haven’t posted much here lately because I’ve been too busy making. And preparing for my Masters show in November. Here is a sneak peek at some of my pieces. In addition to functional pieces, I’m also working on a possible sculptural narrative. I feel like I still have a long way to go, but that said, I’m heading for a two-week workshop in ceramic sculptural form at the Haystack School of Craft in Maine. Perhaps I’ll come back with new inspiration.
I used paper clay to create the impressionistic people in the sculpture pictured. So great working with paper clay. It’s pliable and light. When it survives through the bone dry and bisque stages without clumsy mishandling (and breakage) to the finished glaze product, it’s as strong as any other vitrified glazed piece.
I made some pieces in high-fire clay a couple of years ago with the idea that I would seek an opportunity to do an atmospheric firing of some sort. After all, I am a student at a college that has a pretty impressive kiln yard. But then Covid hit and that was the end of that for a long time. But I kept most of the pieces in reserve for just in case.
I haven’t taken any of the atmospheric firing classes ($$$) because I don’t really see this as my aesthetic moving forward and prefer to concentrate on the electric kiln, which will be my mainstay. But finally my opportunity for a free firing came. I jumped on the chance to get in on a wood firing.
Here are my results:
This smallish vase is stoneware with porcelain slip. I added some glaze that would produce a copper red in reduction. Since reduction in woodfire is apparently hit or miss, I was not sure of the results. But the vase apparently did get a bit of oxygen starvation because there are flashes of red here and there on the outside and a good dose on the inside of the pot. Okay. Not a bad result.
Next we have this mid-sized bowl. The first thing I noticed was that it was no longer round, having warped quite a bit. I think this is a feature of woodfiring at high temperatures because I see other people’s woodfired pieces also exhibiting warpage. Probably the bigger the piece, the more likely to warp. Also, I think it depends on where the piece is in the kiln. This bowl was near the front of the kiln where the wood was getting shoved in and where the temperature was the hottest. The other thing I noticed was that it had a fair amount of ash drip on the footring. I always hear woodfirers talking about having to grind. Now I know why. Sigh.
I don’t think this bowl can be used for anything but display. The glaze on the inside crystalized into crackled glass, making for a beautiful look, but not something you would want to put food into.
I made this butter keeper in a community center class where the instructor tends to introduce interesting projects that have culinary (or otherwise) usefulness. I had never heard of a butter keeper, whereby you stuff soft butter up into the open part of the lid, place some water into the bottom, and put the butter in the lid into the pot. The butter will apparently stay fresh on the counter for weeks. Soft, spreadable butter whenever you want it. I wonder if it works…
But back to woodfiring pottery…I put some sort of glaze on this one, but I have no idea if the black stuff is the result of the glaze or wood ash doing its thing. I fired these two pieces separately. The inside is very funky looking.
This one is a garlic keeper on which I put some sort of slip from a big bucket. I guess the slip caught the heat and produced the red flashes. Interesting, but a bit boring. The wads I had placed inside the lid on the rim got stuck. When I pried them off, one left some grinding work. /-:
I decided to let the woodfire have its way with this small vase. I added some glaze to the carved out areas, but that is not super apparent in the results. At least there is nothing to grind on this one.
This cup had red underglaze in the circles. The red color survived in areas that got less heat, but turned white where it got blasted. The liner glaze on the inside turned into a semi-melted wormy mess. The high-fire bucket glazes that were available for my use were old and unmaintained, which could have caused some of my problems.
These two pots started out much the same. A few of us (including the community center instructor) were doodling around with mocha diffusion without knowing what we were doing and ended up with some interesting, but not really mocha diffusion results. I now know what we did wrong, but that’s another story for another time.
The pot on the left was woodfired. The one on the right did not make it into the woodfiring kiln because there was no more room. I stuck it in a test kiln and fired it to cone 10 (high fire). When I made it initially, it was because my husband had asked for something in which to put his pencils. Two years later, he has a nice pencil holder.
Both pots had the same surface treatments–failed mocha diffusion attempts and splashes of suspicious looking turquoise glaze from a bucket–but look how differently they turned out. The woodfired pot features lovely shades of red (flashings), black (carbon and ash trapping), and blue (the blue underglaze from the mocha diffusion and/or the blue bucket glaze). It’s one of my favorites from this firing.
And saving (for me) the best for last, here is a large vase I decorated with black underglaze strokes and red clay paperclay balls. I also liberally splashed on some of the copper red glaze. I think the glaze turned white, making for some nice foliage while the paperclay balls turned coppery. I’m keeping this one.
So the takeaway from all of this is that it was fun to do, but for me it lacks the measure of result control I’m beginning to enjoy in electric kilns, especially now that I have my own kiln. The atmospheric firing world is very random and produces surprising results, at least to the novice. Plus there’s the grinding. That said, I probably wouldn’t turn down another opportunity to do this, but I still have no desire to move to this kind of firing on a regular basis. I’ll just admire other, more experienced atmospheric potters’ results.
Remember way back on March 26 when I posted an update about what I was doing while not having access to a kiln? In fact, here, I’ll even give you the link: https://ceramiclectia.wordpress.com/2020/03/26/pottery-in-the-time-of-coronavirus/. Well, I finally finished a couple of those projects. The big bowl with the balls (kind of like this one) that I was repairing with paperclay bit the dust. The paperclay didn’t work on an already bisqued piece that was so large. It came back in even more pieces. Sad. Very sad. But I moved on.
The vase with the blue balls on the left is the only survivor (after I lost that big bowl) of the porcelain workshop I took last fall. It ended up being a crossover project as I affixed paperclay balls (paperclay was my research project for my Clay Materials class) to the outside as decoration. It worked pretty well. I also tried Amaco’s brush-on celadon glaze. The clear comes out very shiny and nice, but unfortunately it covered over the blue celadon I had painted on under it on the balls. I had to reglaze the piece to get the blue back on. The nice thing about using paperclay for outside decoration is that it’s very light. If I had put clay balls on the outside of this vase, it would have ended up being very heavy.
The square something on the left is all paperclay. If you follow the link in paragraph 1, you’ll see how it started. I’m not sure I would use paperclay to make functional items again. It’s more for sculpture. But it was fun to try this. I had painted green celadon on top of the clear celadon, so there was no having to redo anything. Learning from my experimentation.
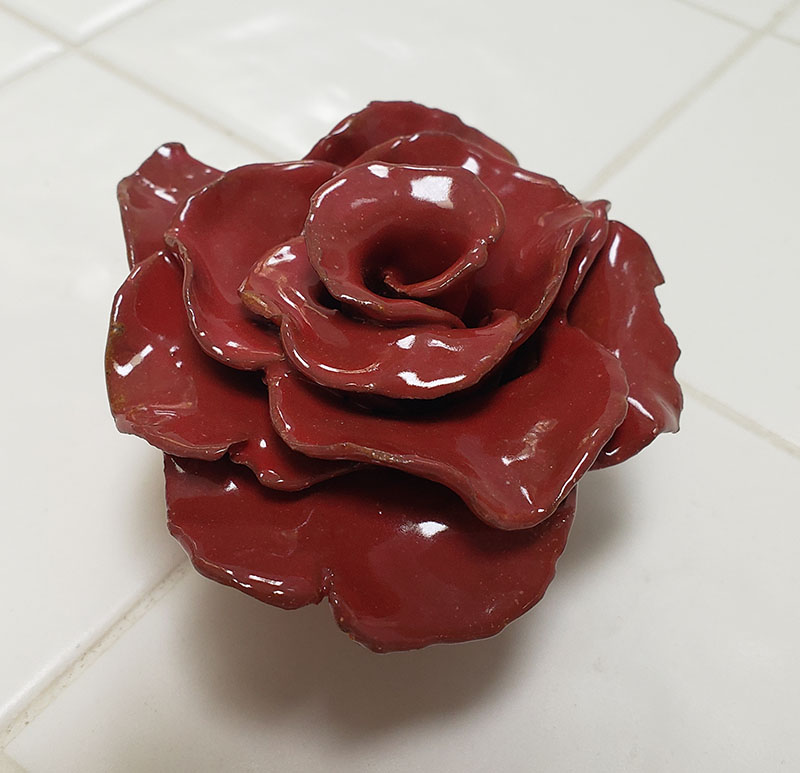
A pottery friend and I got together on Zoom one day to make roses she had learned how to make in a class she was taking. This is my rose. She used regular clay. I was still in the middle of experimenting with paperclay at the time, so I used paperclay made from red stoneware. Actually, paper clay was a great material to use to make the very thin petals of the rose. Paperclay dries very hard and durable. The bisque state is another story. You have to take some care as it gets quite brittle—the exact opposite of straight clay. Once the rose is glaze fired, it looks and feels just like any other glazed piece. I used Amaco Snapdragon glaze on this rose.
I’m not quite sure what I will do with my rose yet as it doesn’t figure into my current artistic ideas, but it’s really pretty to look at.